





White Spots on Weed Leaves: A Home Grower’s Guide

You know the moment. You’re doing a quick leaf check, everything looks fine, then one fan leaf catches your eye. A few pale specks. Maybe a dusty patch. Maybe something that definitely wasn’t there yesterday.
That little jolt is normal. White spots on weed leaves can mean a few different things, and some are much easier to fix than they look at first glance. The mistake most growers make is rushing into treatment before they’ve figured out the cause. Spray the wrong thing, change the wrong setting, or start feeding harder, and you can turn a small problem into a messy one.
Most of the time, this is manageable. What matters is catching it early, slowing the spread, and being honest about what you’re seeing. Fuzzy and wipeable is different from pinprick damage. Bleaching near the light is different from fungal growth. A harmless residue is different from a pest issue building under the leaves.
A good grower doesn’t avoid problems. A good grower spots them early and responds fast.
Found White Spots on Your Weed Leaves? Don't Panic
The first time white spots show up, the worst is often assumed. Bud rot, ruined harvest, whole tent contaminated. Sometimes it is serious, but very often it’s still in the stage where a calm inspection saves the run.
The first thing to do is simple. Stop touching every plant in the room. If the issue is fungal or pest related, your hands, sleeves, scissors, and even the airflow from moving branches around can help spread it.
Start with one leaf. Look at the top, then the underside. Rub the spot gently between two fingers or with a damp paper towel. Ask basic questions before you do anything fancy:
- Does it wipe off easily: That points more toward powdery mildew or residue.
- Does it look like tiny dots: That can point toward pest feeding.
- Is it closer to the top of the canopy: That often suggests light or heat stress.
- Are only a few leaves affected: That’s usually a much better situation than wide, random spread.
Practical rule: If you can still describe the issue as "a few spots on a few leaves," you're early enough to make clean decisions.
This is one of those grow-room moments where being methodical beats being aggressive. Don’t start mixing every spray bottle you own. Don’t crank nutrients up or down on a guess. Don’t cut half the plant apart because one leaf looks rough.
White spots are a symptom. The main job is finding the cause.
What Are These White Spots? A Diagnostic Checklist
A lot of leaf problems look similar from across the tent. Up close, they don’t. Texture, location, and pattern tell you almost everything you need to know.
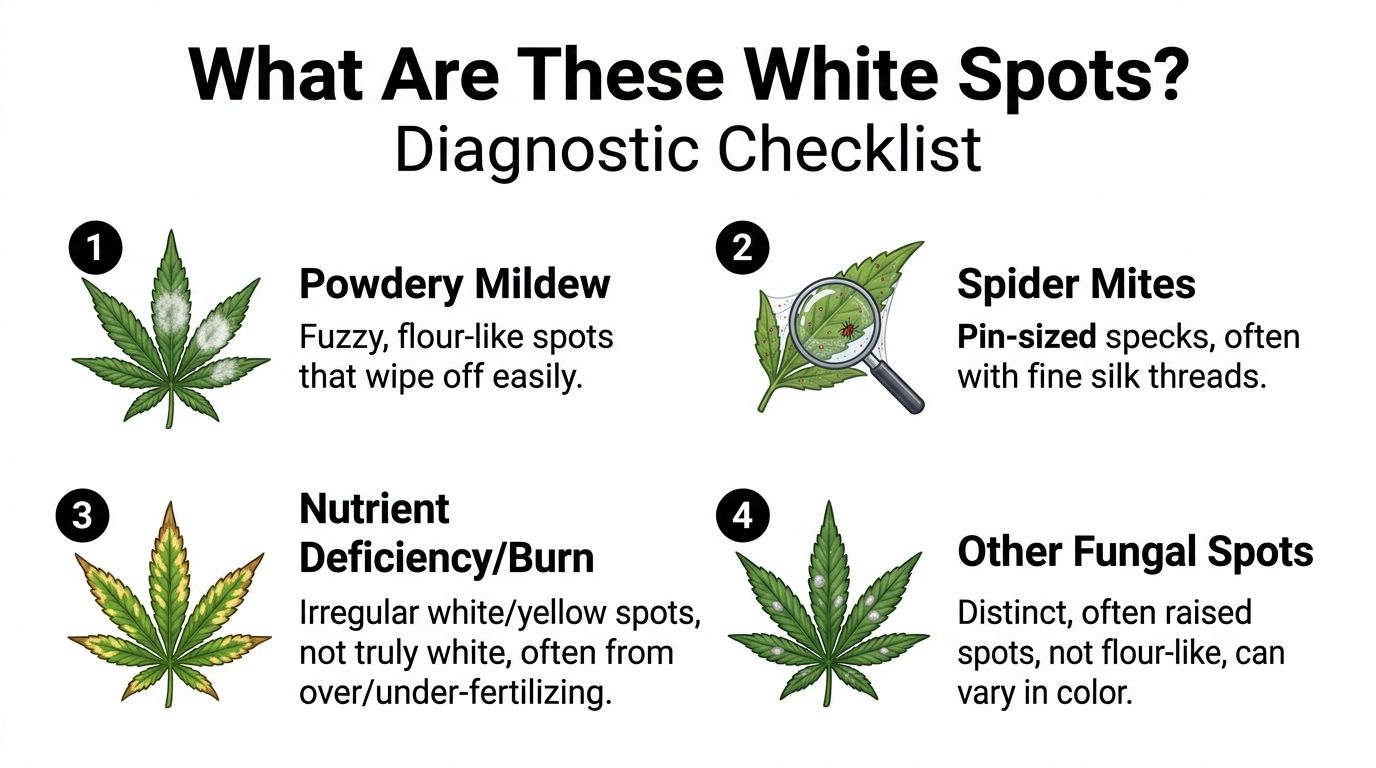
Powdery mildew clues
If the white spots look like someone dusted the leaf with flour, powdery mildew should be your first suspect. It often starts small, then moves fast in stagnant, humid spaces. According to AirRo Shield’s review of powdery mildew on cannabis, it can affect up to 80 to 90% of indoor cannabis grows in high-humidity environments, symptoms can begin as 1 to 2mm white flour-like patches, those patches can expand within 7 to 10 days at 20 to 25°C, and untreated cases can reduce yields by 20 to 50%.
That sounds dramatic, but the look is pretty distinct:
- Texture matters: It’s soft, dusty, or chalky.
- Wipe test: It usually comes off when gently wiped.
- Spread pattern: It often starts in small patches, then broadens across leaf surfaces.
If you touch it and it smears like dust, don’t keep handling the plant. That’s how spores end up elsewhere.
Spider mite clues
Spider mites don’t usually look powdery. Their damage looks more like tiny pale stippling, especially when you inspect the leaf underside. If you’re seeing fine silk threads between leaf stems or tucked along the lower side of leaves, that’s a strong clue too.
A quick way to separate mites from mildew is this: mildew looks like growth sitting on the leaf, while mites leave damage from feeding on the leaf.
Look for:
- Pin-sized specks: More like tiny punctures than dusty coating
- Underside activity: Flip leaves over and inspect carefully
- Fine webbing: Usually shows up once the problem is more established
If you want a deeper breakdown of deficiency symptoms that can mimic pest or disease issues, this guide on cannabis nutrient deficiencies is worth comparing against what you’re seeing.
Nutrient stress and light stress clues
Not every pale mark is a pathogen or bug problem. Sometimes growers see white spots on weed leaves when the problem is environmental stress or a feeding mistake.
These usually show up differently:
| Cause | What it tends to look like | What it usually doesn't do |
|---|---|---|
| Light stress | Bleached patches near the top canopy | Wipe off like dust |
| Nutrient imbalance | Irregular pale spotting, edge damage, discoloration | Form fuzzy growth |
| Mineral residue | Dried splash marks after spraying or watering | Spread across new leaves on its own |
Spots from light stress often show up on the leaves closest to the fixture. The tissue can look pale, dry, or washed out rather than fuzzy. Nutrient issues usually come with other signs too, curling, edge burn, strange color shifts, or a pattern tied to older or newer growth.
If a spot feels dry and dead rather than soft and dusty, think stress before fungus.
Mineral residue is another one that fools people. If you misted with hard water or had splashback from a foliar spray, dried deposits can leave pale marks. Those usually stay where the droplets landed and don’t spread like an active problem.
Other fungal spots
Some fungal issues don’t present as classic powdery mildew. Instead of a flour-like coating, you may see isolated white, gray, or off-color raised spots. These can look firmer, more contained, and less wipeable.
That’s why texture is such a useful shortcut:
- Powdery and easy to remove: mildew is likely
- Raised but not dusty: think other fungal spotting
- Dry, brittle, or bleached: think environment
- Tiny dots plus webbing: think mites
When growers misdiagnose, they usually focus only on color. Color helps, but pattern and feel provide the complete picture.
Your Action Plan for Treating Powdery Mildew
You spot a few dusty white patches during lights-on, wipe one with your finger, and it smears. That is the moment to get organized. Powdery mildew is one of those problems that stays manageable if you act the same day and gets ugly fast if you wait for “a better time” to deal with it.
Start by reducing the spore load in the room. Remove badly hit leaves, bag them immediately, and keep your hands and tools clean between plants. Then fix the room conditions that let mildew spread in the first place. Powdery mildew does best in high humidity, mild temperatures, and stale air. One cultivation reference notes stronger suppression at 45 to 55% RH during veg, under 50% in flower, with mildew favored by relative humidity above 70%, temperatures around 20 to 26°C, and spore germination possible within 4 to 8 hours under the right conditions (PreAir’s treatment guide for white spots on cannabis leaves).
That matters because sprays alone rarely carry the whole job. If the canopy stays crowded and the air stays damp, mildew usually returns.
Use the three-step organic approach
I keep this simple because simple gets done.
Wipe affected leaves first
Use a damp paper towel to remove visible powder before spraying. That cuts down the material sitting on the leaf and helps your follow-up treatment contact the surface instead of landing on loose spores.Apply potassium bicarbonate with lights off
Mix 1 tablespoon per gallon of water and spray affected surfaces during lights-off. Wet leaves under intense light can stress quickly, especially in a tight indoor setup.Follow up with milk sprays once a week
Use 1 part milk to 9 parts water. In the same cultivation reference, that ratio was reported to inhibit mycelial growth by 85 to 95%.
Here’s the video version if you want to see a treatment workflow in action:
What actually works in a home grow
The growers who beat mildew usually do the boring stuff well. They prune for airflow. They treat more than once. They stop spraying random products every day and make the room less friendly to the fungus.
The growers who keep fighting it usually make one of two mistakes. They underreact early, or they keep the plant but ignore the environment.
A practical routine looks like this:
- Isolate the plant if you can: Even a little extra space helps
- Thin dense interior growth: Air needs to move at leaf level, not just above the canopy
- Repeat treatment on schedule: One pass is cleanup, not closure
- Sanitize tools and touchpoints: Scissors, stakes, trays, and tent corners all matter
- Inspect nearby plants closely: Early mildew and early pest damage can overlap visually, so if you see suspicious stippling too, use this guide to identify spider mites on cannabis plants
Prevention starts before the outbreak too. Some cultivars are less forgiving in a crowded tent or a humid basement. If your grow space always runs a bit warm or damp, resilient genetics save work. That is one reason cultivar choice matters as much as treatment. A plant with better mold resistance gives you more margin for error, which is exactly what home growers need when conditions are not perfect every day.
If mildew is still light and limited to fan leaves, the plant is often worth the effort. If it is pushing into dense flower sites, the calculation changes fast.
Tackling Pests and Other Common Leaf Spots
When the white spots aren’t powdery mildew, the fix depends on the pattern. Without recognizing this, growers get into trouble by treating every leaf issue like a fungal problem. Pests, nutrient stress, and environmental damage all need different responses.
If it looks like spider mites
Spider mites leave a very specific kind of frustration behind. The leaves start to look dotted or faded, and if you wait too long, webbing starts to show. Once you see silk, you’re not at the beginning anymore.
Your best first move is a close inspection of the underside of affected leaves. Then respond in layers:
- Remove the worst leaves: Especially the ones with visible webbing
- Wash down the plant carefully: Focus on leaf undersides
- Clean the room: Pests don’t stay politely on one plant
- Keep monitoring: Eggs and newly hatched mites are why one cleanup rarely ends it
For a more focused walkthrough, this guide on spider mites on cannabis plants breaks down identification and prevention in more detail.
A lot of growers go too soft with mites because the early damage looks small. That’s a mistake. If it’s mites, treat it like an active infestation, not a cosmetic issue.
If it looks like nutrient trouble
Nutrient-related spotting tends to be messy, not fuzzy. The leaf may show pale marks, strange interveinal discoloration, margin damage, or a general washed-out look. Usually there’s another clue nearby, twisted new growth, tip burn, or a plant that just looks off even before the spots appear.
A practical reset looks like this:
- Check recent changes: Did you increase feed, switch nutrients, or let pH drift?
- Use pH-balanced water if the medium seems overloaded: A gentle flush can help clear excess salts in many setups
- Resume feeding more carefully: Don’t swing from overfeeding to starving the plant
Growers often confuse deficiency with lockout. The leaf says "I’m not getting what I need," but the cause may be too much in the root zone, not too little.
Leaves can show deficiency symptoms when the root zone is overloaded, stressed, or out of balance. More feed isn't always the answer.
If it looks like light or heat stress
This one usually shows up near the top of the canopy. The affected leaves can look bleached, thin, or dry. Unlike mildew, the spots won’t wipe away. Unlike mites, there’s no feeding pattern and no webbing.
A simple comparison helps:
| Sign | More likely stress | More likely pest or fungus |
|---|---|---|
| Top canopy only | Yes | Less often |
| Crispy texture | Yes | Less often |
| Wipes off | No | Mildew often does |
| Webbing present | No | Spider mites often do |
The fix is less glamorous than people expect. Increase distance from the light, reduce intensity if your fixture allows it, and improve airflow through the canopy so leaf surfaces don’t sit in hot pockets.
If it’s just residue
Sometimes the answer is refreshingly boring. Hard water, foliar overspray, or dried nutrient splash can leave white marks that look worse than they are.
Try this:
- Wipe one spot with a damp cloth
- Check whether new leaves stay clean
- Review what you sprayed recently
If the mark disappears and doesn’t return on fresh growth, you probably don’t have a spreading issue. You have leftover residue and a lesson in spray technique.
How to Prevent White Spots from Coming Back
Most growers think prevention starts with fans or sprays. It starts earlier than that. It starts with not setting up a room, and a cultivar choice, that constantly fights your environment.
Build a room that doesn't invite problems
White spots keep coming back when the grow space keeps giving them an opening. The big offenders are stale air, humidity drift, crowded canopies, and inconsistent watering habits that push the room into swings.
A cleaner setup usually comes down to a few habits:
- Keep air moving through and under the canopy: Leaves shouldn’t sit pressed together in still pockets
- Thin dense interior growth when needed: Crowded foliage traps moisture
- Be careful with foliar sprays: Wet leaf surfaces at the wrong time create avoidable problems
- Watch your root-zone routine: Watering too often can push humidity and stress the plant at the same time
If your pH is off, plants can also show stress that muddies the diagnosis. This guide on pH for cannabis is useful if leaf problems keep showing up alongside feeding issues.
Genetics matter more than most growers admit
This part gets overlooked all the time. Some cultivars are just touchier in humid rooms. Some handle a less-than-perfect home setup with much less drama. That difference matters more than people want to admit.
One verified source points out that proactive strain selection is a key prevention strategy often overlooked, and that choosing cannabis genetics with inherent powdery mildew or pest resistance can significantly reduce disease pressure before it starts, especially in high-humidity environments. That point is discussed in a seed bank’s guide to white spots on weed.
That lines up with what experienced home growers see in practice. Two plants can sit in the same tent, under the same light, with the same care, and one stays clean while the other turns into a maintenance project.
The easiest mildew treatment is not needing one because the cultivar never became the weak link in your room.
Prevention is a trade-off game
You can grow a finicky cultivar because you love the aroma, structure, or final flower vibe. That’s a real choice. Just be honest about what comes with it. A more sensitive plant may demand tighter environmental control, more pruning, and faster response when conditions drift.
A tougher cultivar gives you a wider margin for error. That matters if you’re a first-time grower, running a small tent in a garage, or working in a climate where humidity likes to spike.
Good prevention isn’t one silver bullet. It’s stacking small advantages:
- a room with moving air
- a canopy that can breathe
- a sane watering routine
- a cultivar that fits your setup instead of fighting it
That last point saves more stress than any miracle spray.
Knowing When to Save a Plant Versus Starting Over
Every grower has to make this call eventually. It’s not fun, but it’s part of becoming better at this. A plant doesn’t deserve saving just because you’ve already put time into it.
Save it when the problem is limited
A plant is usually worth treating when the issue is still local and the structure is otherwise healthy. A few affected fan leaves in veg, mild damage caught early, or a single plant with manageable symptoms in a clean room, those are all situations where recovery makes sense.
Signs a plant is still a decent candidate:
- Damage is limited to a small area
- New growth still looks healthy
- The issue was caught early
- The rest of the room is still clean
Early powdery mildew on leaves can be handled. Mild pest spotting can be handled. A little residue or stress damage is often just a course correction.
Cut your losses when risk outweighs reward
The hard line usually shows up when contamination has moved deep into the plant, especially around flowers, or when the plant has become a constant source of spread in a shared space.
If the plant is heavily affected, repeatedly relapsing after treatment, or threatening the rest of the garden, starting over is often the smarter move.
Ask yourself:
| Question | If the answer is yes |
|---|---|
| Is it spreading fast despite treatment? | Consider culling |
| Is it reaching flowers or tight interior sites? | Risk goes up sharply |
| Is one plant threatening the whole room? | Protect the room first |
| Would you be happy finishing this plant? | If not, move on |
A home grow isn’t just about finishing plants. It’s about finishing plants you feel good about.
There’s no prize for dragging a bad candidate to harvest if it compromises everything around it. Sometimes the most experienced move in the room is removing one plant, cleaning hard, and restarting with better conditions and a more suitable cultivar.
Your Questions on Cannabis Leaf Health Answered
Are buds okay if the plant had powdery mildew on the leaves
That depends on where the mildew stayed. If the issue was limited to a few leaves early and you cleaned it up fast, you may still have acceptable flower on unaffected parts of the plant. If you see any sign of mildew on the buds themselves, treat that as a serious quality problem.
The easy rule is this: don’t try to talk yourself into keeping obviously contaminated flower. If it looks dusty, dull, or moldy, trust your eyes.
Can I reuse the soil from a plant that had a fungal issue
You can, but many home growers decide it isn’t worth the uncertainty unless they have a reliable way to fully sanitize and reset their process. If the plant had a persistent fungal problem, reusing the medium without a solid cleanup plan can bring the same headache into the next run.
If you do reuse anything, keep it practical:
- Clean containers thoroughly
- Remove all infected plant material
- Don’t carry over dead leaves or root debris
- Fix the environmental issue that allowed the problem in the first place
Reusing soil while keeping the same humidity problems is how growers end up blaming the medium for what the room caused.
How do I tell mildew from trichomes on flower
Trichomes look sparkly, resinous, and intentional. Powdery mildew looks dull, dusty, and wrong. Trichomes belong to the flower structure. Mildew sits on the surface like a film.
A loupe helps here. Under magnification, trichomes look like glandular structures. Mildew looks more like flat contamination.
Healthy resin glitters. Mildew looks like someone shook flour over the plant.
Should I remove every spotted leaf immediately
No. Remove the ones that are clearly compromised or blocking airflow, but don’t strip the plant into stress because you got nervous. Leaves still do work for the plant, even when a few look rough.
Be selective. Heavy damage, obvious fungal growth, visible webbing, or badly stressed top leaves are fair targets. Randomly defoliating half the canopy is not a treatment plan.
How often should I inspect for white spots
In a healthy room, a quick daily scan catches most problems before they become real work. You don’t need a full forensic exam every day, but you do want a rhythm.
A solid routine looks like this:
- Check tops and undersides of a few leaves daily
- Look closer after watering, pruning, or environmental changes
- Inspect any plant that suddenly looks dull, faded, or droopy
- Keep a loupe or pocket microscope nearby
That habit does more for your harvest than almost any bottle on the shelf.
If you want to stack the odds in your favor before the first leaf even opens, start with genetics that fit your setup. Botanist Seeds makes it easier to compare feminized and autoflower cultivars so you can choose options that match your space, climate, and growing style. That means fewer avoidable problems, less guesswork, and a much better shot at the kind of harvest you want to keep.












